- Introduction
- Configuring Windows Properly
- Configuring Linux Properly
- Patching the Operating System
- Configuring Browsers
- Summary
This chapter is from the book
This chapter is from the book
This chapter is from the book
Configuring Windows Properly
Properly configuring Windows (with a focus on Windows 10/11 and Windows Server 2019) consists of many facets. You must disable unnecessary services, properly configure the registry, enable the firewall, properly configure the browser, and more. Chapter 4, “Firewall Practical Applications,” discussed the Internet connection firewall and the processes of both stateful packet inspection and stateless packet inspection, and a later section of this chapter discusses browser security. For now, let’s go over the other important factors in Windows security configuration.
Accounts, Users, Groups, and Passwords
Any Windows system comes with certain default user accounts and groups. These can frequently be a starting point for intruders who want to crack passwords for those accounts and thereby gain entrance onto a server or network. Simply renaming or disabling some of these default accounts can improve your security.
In Windows 10, go to Start and type Accounts. Figure 8-1 shows a screen similar to the one you will see.
)
FIGURE 8-1 Users and groups
You can also go to Control Panel > User Accounts. You will get a screen similar to the one shown in Figure 8-2.
)
FIGURE 8-2 User accounts
By selecting Manage Accounts, you can then add, delete, or alter any user accounts, as shown in Figure 8-3.
)
FIGURE 8-3 Managing user accounts
Administrator Accounts
The default administrator account has administrative privileges, and hackers frequently seek to obtain the logon information for an administrator account. Guessing a logon is a twofold process of first identifying the username and then the password. Default accounts allow the hacker to bypass the first half of this process.
Administrators should disable this account. If you double-click on any account (recall the Users and Groups utility previously shown in Figure 8-3), you will have the ability to change the account type. The specific look and feel of this screen depends on how you arrived at it. Going through the Control Panel will get you to a different look than simply typing users at the start. You can see account type in Figure 8-4.
)
FIGURE 8-4 Changing the account type
Obviously, having an account with administrative privileges is necessary for maintaining your server. The next step is adding a new account, one with an innocuous name (for example, temp_clerk, receptionist, etc.), and giving that account administrative privileges. Doing so makes a hacker’s task more difficult, as he must first ascertain what account actually has administrative privileges before he can even attempt to compromise that account.
Some experts suggest simply renaming the administrator account, or using an administrator account that has a username that indicates its purpose. That is not the recommendation of this book for the following reasons:
The whole point is that a hacker should not be able to readily tell which username has administrative privileges.
Simply renaming the administrator account to a different name, but one that still indicates its administrative rights, will not help this situation.
Other Accounts
We have concentrated on the administrator account because it is the one most often targeted by hackers, but Windows also includes other default user accounts. Applying an equally rigorous treatment to all default accounts is a good idea. Any default account can be a gateway for a hacker to compromise a system. A few accounts that you should pay particular attention to include:
IUSR_Machine name: When you are running IIS, a default user account is created for IIS. Its name is IUSR_ and the name of your machine. This is a common account for a hacker to attempt to compromise. Altering this one in the manner suggested for the administrator account is advisable.
ASP.NET: If your machine is running ASP.NET, a default account is created for web applications. A hacker that is familiar with .NET could target this account.
Database accounts: Many relational database management systems, such as SQL Server, create default user accounts. An intruder, particularly one who wants to get at your data, could target these accounts.
Of course, you must have accounts for all of these and other services. The suggestion here is to ensure that the names of these accounts are not obvious and that default accounts are not used.
When adding any new account, always give the new account’s user or group the least number and type of privileges needed to perform their job, even accounts for IT staff members. Here are a few examples of places to restrict user access/privileges that you might not think of:
A PC technician does not need administrative rights on the database server. Even though she is in the IT department, she does not need access to everything in that department.
Managers may use applications that reside on a web server, but they certainly should not have rights on that server.
Just because a programmer develops applications that run on a server does not mean that he should have full rights on that server.
Perhaps this might be another position to reinforce the procedures of RBAC (Role-Based Access Control), DAC (Discretionary Access Control), and MAC (Mandatory Access Control).
These are just a few examples of things to consider when setting up user rights. Remember: Always give the least access necessary for that person to do her job. This concept is often termed least privileges and is a cornerstone of security.
Setting Security Policies
Setting appropriate security policies is the next step in hardening a Windows server. This does not refer to written policies an organization might have regarding security standards and procedures. In this case the term security policies refers to the individual machines’ policies. When you select Start, Settings, Control Panel, Administrative Tools, you will also note the Local Security Policy. Double-clicking this and selecting Account Policies takes you to the screen shown in Figure 8-5. The various subfolders in the dialog box shown in Figure 8-5 are expanded. Normally when you open this utility they will not be. Note that in Windows 10 you can access this same screen by going to the Run menu and typing gpedit (this is the Local Group Policy Editor utility). You will also get to this screen by typing local policy.
)
FIGURE 8-5 Local security policies
The first matter of concern is setting secure password policies. The default settings for Windows passwords are not secure. Table 8-1 shows the default password policies. Maximum password age refers to how long a password is effective before the user is forced to change that password. Enforce password history refers to how many previous passwords the system remembers, thus preventing the user from reusing passwords. Minimum password length defines the minimum number of characters allowed in a password. Password complexity means that the user must use a password that combines numbers, letters, and other characters. These are the default security settings for all Windows versions from Windows NT 4.0 forward. If your system is protected within a business environment, the settings at Local Security will be grayed out, indicating you do not have permission to make changes.
TABLE 8-1 Default Windows Password Policies
Policy |
Recommendation |
|---|---|
Enforce password history |
1 password remembered |
Maximum password age |
42 days |
Minimum password age |
0 days |
Minimum password length |
0 characters |
Passwords must meet complexity requirements |
Disabled |
Store password using reversible encryption for all users in the domain |
Disabled |
The default password policies are not secure enough, but what policies should you use instead? Different experts answer that question differently. Table 8-2 shows the recommendations of Microsoft, the National Security Agency, and the author’s personal recommendations (along with an explanation when they differ significantly from the Microsoft or NSA recommendations).
TABLE 8-2 Password Setting Recommendations
Policy |
Microsoft |
NSA |
Author |
|---|---|---|---|
Enforce password history |
3 passwords |
5 passwords |
3 passwords |
Maximum password age |
42 days |
42 days |
60 days |
Minimum password age |
2 days |
2 days |
2 days |
Minimum password length |
14 characters |
12 characters |
A minimum of 14 characters. Longer passwords, or passphrases, are best. |
Passwords must meet complexity requirements |
No recommendation (left to user discretion) |
Yes |
Yes |
Store password using reversible encryption for all users in the domain |
No recommendation (left to user discretion) |
No recommendation |
No recommendation (left to user discretion) |
Developing appropriate password policies depends largely on the requirements of your network environment. If your network stores and processes highly sensitive data and is an attractive target to hackers, you must always skew your policies and settings toward greater security. However, bear in mind that if security measures are too complex, your users will find complying difficult. For example, very long, complex passwords (such as $%Tbx38T@_FgR$$) make your network quite secure, but such passwords are virtually impossible for users to remember. Many users will simply write the password on a note and keep it in a handy but insecure location, such as the top drawer of their desks, a major security problem.
Account Lockout Policies
When you open the Local Security Settings dialog, your options are not limited to setting password policies. You can also set account lockout policies. These policies determine how many times a user can attempt to log in before being locked out, and for how long to lock them out. The default Windows settings are shown in Table 8-3.
These default policies are not secure. Essentially they allow for an infinite number of log-in attempts, making the use of password crackers very easy and virtually guaranteeing that someone will eventually crack one or more passwords and gain access to your system. Table 8-4 provides the recommendations from Microsoft, National Security Agency, and the author.
TABLE 8-3 Windows Default Account Lockout Policy Settings
Policy |
Default Settings |
|---|---|
Account lockout duration |
Not defined |
Account lockout threshold |
0 invalid logon attempts |
Reset account lockout counter after |
Not defined |
TABLE 8-4 Recommended Account Lockout Policies
Policy |
Microsoft |
NSA |
Author |
|---|---|---|---|
Account lockout duration |
0, indefinite |
15 hours |
48 hours. If someone is attempting to crack passwords on weekends/holidays, you want the account locked until an administrator is aware of the attempt. |
Account lockout threshold |
5 attempts |
3 attempts |
3 attempts |
Reset account after |
15 minutes |
30 minutes |
30 minutes |
Other Issues
Some account and password issues cannot be handled with computer settings. These involve setting organizational policies regarding user and administrator behavior. Chapter 11, “Security Policies,” discusses such organizational policies in greater depth. For now, simply consider this basic list of the most important organizational security policies:
Users must never write down passwords.
Users must never share passwords.
Administrators must use the least required access rule. That means most users should not have administrative privileges even on their own desktops.
Registry Settings
Secure registry settings are critical to securing a network. Unfortunately, my experience has been that this area is often overlooked by otherwise secure practices. One thing to keep in mind is that if you don’t know what you are doing in the registry, you can cause serious problems. So, if you are not very comfortable with the registry, don’t touch it. Even if you are comfortable making registry changes, always back up the registry before any change.
The Windows Registry is a database used to store settings and options for Microsoft Windows operating systems. This database contains critical information and settings for all the hardware, software, users, and preferences on a particular computer. Whenever users are added, software is installed, or any other change is made to the system (including security policies), that information is stored in the registry.
Registry Basics
The physical files that make up the registry are stored differently depending on which version of Windows you are using. Older versions of Windows (that is, Windows 95 and 98) kept the registry in two hidden files in your Windows directory, called USER.DAT and SYSTEM.DAT. In all versions of Windows since XP, the physical files that make up the registry are stored in %SystemRoot%\System32\Config. Since Windows 8, the file has been named ntuser.dat. Regardless of the version of Windows you are using, you cannot edit the registry directly by opening and editing these files. Instead you must use a tool, regedit.exe, to make any changes. There are newer tools like regedit32. However, many users find that the older regedit has a more user-friendly “find” option for searching the registry. Either one will work.
Although the registry is referred to as a “database,” it does not actually have a relational database structure (like a table in MS SQL Server or Oracle). The registry has a hierarchical structure similar to the directory structure on the hard disk. In fact, when you use regedit, you will note it is organized like Windows Explorer. To view the registry, go to Start, Run, and type regedit. You should see the Registry Editor dialog box, shown in Figure 8-6. Some of the folders in your dialog box might be expanded. If so, simply collapse them so that your registry looks like the one shown in Figure 8-6.
)
FIGURE 8-6 The windows registry hive
Your Registry Editor dialog box will likely have the same five main folders as the ones shown in Figure 8-6. Each of these main branches of the registry is briefly described in the following list. These five main folders are the core registry folders. A system might have additions, but these are the primary folders containing information necessary for your system to run.
HKEY_CLASSES_ROOT: This branch contains all of your file association types, OLE information, and shortcut data.
HKEY_CURRENT_USER: This branch links to the section of HKEY_USERS appropriate for the user currently logged on to the PC.
HKEY_LOCAL_MACHINE: This branch contains computer-specific information about the type of hardware, software, and other preferences on a given PC.
HKEY_USERS: This branch contains individual preferences for each user of the computer.
HKEY_CURRENT_CONFIG: This branch links to the section of HKEY_LOCAL_ MACHINE appropriate for the current hardware configuration.
If you expand a branch, you will see its subfolders. Many of these have, in turn, more subfolders, possibly as many as four or more before you get to a specific entry. A specific entry in the Windows Registry is referred to as a key. A key is an entry that contains settings for some particular aspect of your system. If you alter the registry, you are actually changing the settings of particular keys.
This is just a brief overview of the registry. If you intend to do more extensive work with the registry than setting the proper security, you can use the following sources:
50 Best Windows Registry Hacks
Windows Registry Tips: http://techtweek.com/windows/all-important-windows-registry-tips-and-tweaks
Microsoft’s Windows Registry support page: https://support.microsoft.com/en-us/help/256986/windows-registry-information-for-advanced-users
Keep in mind that registry settings can change in different versions of Windows, so it is possible that you might not find one or more of the following settings, or they might be in a slightly different location. To find and check your registry settings for any of these keys, simply expand the appropriate node and work your way down to the specific key. For example, the first one on our list is HKLM\SYSTEM\CurrentControlSet\Services\LanmanServer. You could first expand the LOCAL_MACHINE node, then the SYSTEM node, then the CurrentControlSet node, then the Services node. You should then be able to find the specific registry key you are looking for; in this example, we found LanmanServer. The same process can be applied to find any key; the LanmanServer key was randomly chosen for this example.
Restrict Null Session Access
Null sessions are a significant weakness that can be exploited through the various shares that are on the computer. A null session is Windows’ way of designating anonymous connections. Any time you allow anonymous connections to any server, you are inviting significant security risks. Modify null session access to shares on the computer by adding RestrictNullSessAccess, a registry value that toggles null session shares on or off to determine whether the Server service restricts access to clients logged on to the system account without username and password authentication. Setting the value to 1 restricts null session access for unauthenticated users to all server pipes and shares except those listed in the NullSessionPipes and NullSessionShares entries.
Key Path: HKLM\SYSTEM\CurrentControlSet\Services\LanmanServer
Action: Ensure that it is set to: Value = 1
Restrict Null Session Access Over Named Pipes
The null session access over named pipes registry setting should be changed for much the same reason as the preceding null session registry setting. Restricting such access helps prevent unauthorized access over the network. To restrict null session access over named pipes and shared directories, edit the registry and delete the values, as shown in Table 8-5.
Key Path: HKLM\SYSTEM\CurrentControlSet\Services\LanmanServer
Action: Delete all values
TABLE 8-5 TCP/IP Stack Registry Settings
Key Path |
Recommended Value |
|---|---|
DisableIPSourceRouting |
2 |
EnableDeadGWDetect |
0 |
EnableICMPRedirect |
0 |
EnablePMTUDiscovery |
0 |
EnableSecurityFilters |
1 |
KeepAliveTime |
300,000 |
NoNameReleaseOnDemand |
1 |
PerformRouterDiscovery |
0 |
SynAttackProtect |
2 |
TcpMaxConnectResponseRetransmissions |
2 |
TcpMaxConnectRetransmissions |
3 |
TCPMaxPortsExhausted |
5 |
Restrict Anonymous Access
The anonymous access registry setting allows anonymous users to list domain usernames and enumerate share names. It should be shut off. The possible settings for this key are:
0—Allow anonymous users
1—Restrict anonymous users
2—Allow users with explicit anonymous permissions
Key Path: HKLM\SYSTEM\CurrentControlSet\Control\Lsa
Action: Set Value = 2
TCP/IP Stack Settings
A number of registry settings affect how the TCP/IP stack handles incoming packets. Setting these properly can help reduce your vulnerability to DoS attacks. This process, stack tweaking, is described in Chapter 2, “Types of Attacks.” Because these settings are all related and are found in the same key path, they are shown together in Table 8-5.
As Table 8-5 shows, most of these settings prevent the redirection of packets, change the timeout on connections, and generally alter how Windows handles TCP/IP connections. You can find more details about Microsoft’s recommendations for setting the TCP/IP stack registry settings at its website: https://msdn.microsoft.com/en-us/library/ff648853.aspx.
Remote Access to the Registry
Remote access to the registry is another potential opening for hackers. Many experts advise that there should be no remote access to the registry for any person. This point is certainly debatable. If your administrators frequently need to remotely alter registry settings, then completely blocking remote access to them will cause a reduction in productivity of those administrators. However, completely blocking remote access to the registry is certainly more secure. To restrict network access to the registry:
Add the following key to the registry: HKEY_LOCAL_MACHINE\SYSTEM\ CurrentControlSet\Control\SecurePipeServers\winreg.
Select winreg, click the Security menu, and then click Permissions.
Set the Administrator’s permission to Full Control, make sure no other users or groups are listed, and then click OK.
Recommended Value = 0
Other Registry Settings
Adjusting the previously discussed registry settings will help you avoid some of the most common security flaws in the default Windows Registry settings and will certainly increase the security of any server. However, for maximum security an administrator must take the time to carefully study the Windows Registry for any additional areas that can be made more secure. A few of the additional settings you might want to look into include:
Restricting anonymous access to the registry
NTLMv2 Security (affects security of passwords being sent to the server)
KeepAlive (affects how long to keep a connection active)
SynAttackProtect (protects against a very specific type of SYN attack)
Services
A service is a program that runs without direct intervention by the computer user. In Unix/Linux environments, these are referred to as daemons. Many items on your computer are run as services. Internet Information Services, FTP Service, and many system services are good examples. Any running service is a potential starting point for a hacker. Obviously, you must have some services running for your computer to perform its required functions. However, there are services your machine does not use. If you are not using a service, it should be shut down.
Shutting Down a Service in Windows
Shutting down a service in Windows is relatively easy. In our example we will shut down the FTP service on a machine that does not require FTP.
Go to Start, select Settings, and choose Control Panel. Double-click Administrative Tools, and then double-click Services. You should see the Services dialog box, which looks similar to the one shown in Figure 8-7.
)
FIGURE 8-7 Services
The Services dialog box shows all services installed on your machine, whether they are running or not. Notice that the dialog box also displays information about whether a service is running, whether it starts up automatically, and so forth. In Windows 7 and beyond, more information can be seen by selecting an individual service. When you double-click on an individual service, you see a dialog box similar to Figure 8-8, which gives you detailed information about the service and enables you to change the service’s settings. In Figure 8-8, we are examining the FTP service on a machine that does not require it.
)
FIGURE 8-8 FTP services
In this particular case there are no other dependencies, so you can go to the General tab and do two things: Change the Startup type option to Disabled, and then click the Stop button. When you’re done, the screen will show the status as disabled. The service is now shut down.
Shutting down unneeded services is an essential and very basic part of hardening an operating system. Every running service is a possible avenue for a hacker or a virus to get to your machine, so the rule for services is: If you don’t need it, shut it down. Chapter 12 discusses utilities that scan systems for vulnerabilities. Many of these utilities will point out running services and open ports.
Starting and stopping services from the command prompt is also possible. Many administrators prefer command prompts because it is often faster than going through several layers of the Windows graphical user interface. The syntax is quite simple:
net start servicename
or
net stop servicename
For example:
net stop messenger
net start messenger
Port Filtering and Firewalls in Windows
Chapters 4 and 5 discuss the Windows Firewall. Turning on the Windows port filters is a basic part of operating system hardening. The instructions for doing this have been previously given in Chapters 4 and 5 and will be explored again in exercises at the end of this chapter.
Encrypting File System
Beginning with Windows 2000, the Windows operating system has offered the Encrypting File System (EFS), which is based on public key encryption and takes advantage of the CryptoAPI architecture in Windows 2000. This still exists in Windows 10 and 11; however, with the later versions of Windows, EFS is only available in the upper-end editions of Windows such as Windows Professional. With this system, each file is encrypted using a randomly generated file encryption key, which is independent of a user’s public/private key pair; this method makes the encryption resistant to many forms of cryptoanalysis-based attacks. For our purposes the exact details of how EFS encryption works are not as important as the practical aspects of using it.
User Interaction
The default configuration of EFS enables users to start encrypting files with no administrator effort. EFS automatically generates a public key pair and file encryption certificate for file encryption the first time a user encrypts a file.
File encryption and decryption is supported per file or for an entire folder. Folder encryption is transparently enforced. All files and folders created in a folder marked for encryption are automatically encrypted. Each file has a unique file encryption key, making it safe to rename. If you move a file from an encrypted folder to an unencrypted folder on the same volume, the file remains encrypted. However, if you copy an unencrypted file into an encrypted folder, the file state will change. The file becomes encrypted. Command-line tools and administrative interfaces are provided for advanced users and recovery agents.
FYI: WHAT IF A USER LEAVES?
Users might encrypt a file and then be unavailable to decrypt it. They might become unavailable due to leaving the company, illness, or other reasons. Fortunately, EFS does give administrators a method by which they can recover the encryption key used to encrypt files, and thereby decrypt them. EFS allows recovery agents to configure public keys that are used to recover encrypted data if a user leaves the company. Only the file encryption key is available using the recovery key, not a user’s private key. This ensures that no other private information is revealed to the recovery agent.
The best thing about EFS is that it is virtually transparent to the user. You don’t have to decrypt a file to open it and use it. EFS automatically detects an encrypted file and locates a user’s file encryption key from the system’s key store. However, if the file is moved from the originating computer to another computer, a user trying to open it will find it is encrypted. The following steps will allow you to encrypt any file you want:
Locate the file or folder you want to encrypt (using either Windows Explorer or My Computer/This PC). Right-click on that file and select Properties. The Properties dialog box, similar to the one shown in Figure 8-9, appears.
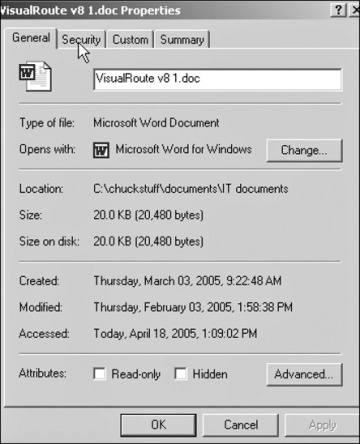
FIGURE 8-9 File properties
Click on the Advanced button to access an option that you can check to encrypt the file, as shown in Figure 8-10.
Click Encrypt contents to secure data.
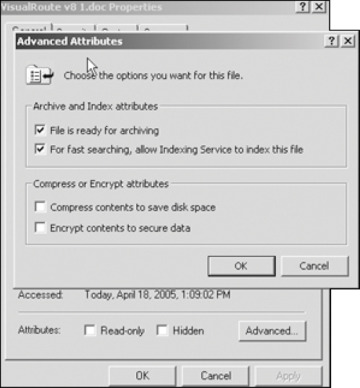
FIGURE 8-10 Encrypting a file
)
)
After you have done this, your file or folder is now encrypted. As long as the same user on the same machine opens the file, it will be decrypted automatically. A hacker who transfers the file to his or her own system (or an employee attempting industrial espionage, who takes the file home on a disk) will find it is encrypted. Because EFS is built into Windows, costs nothing extra, and is so easy to use, it is difficult to find any reason not to use it. If you want more details, the following websites should be helpful to you:
ServerWatch review of EFS
A utility for retrieving EFS encryption keys: www.lostpassword.com/efs.htm
Security Templates
We have been discussing a number of ways for making a Windows system more secure, but exploring services, password settings, registry keys, and other tools can be a daunting task for the administrator who is new to security. Applying such settings to a host of machines can be a tedious task for even the most experienced administrator. The best way to simplify this aspect of operating system hardening is to use security templates. A security template contains hundreds of possible settings that can control a single or multiple computers. Security templates can control areas such as user rights, permissions, and password policies, and they enable administrators to deploy these settings centrally by means of Group Policy Objects (GPOs).
Security templates can be customized to include almost any security setting on a target computer. A number of security templates are built into Windows. These templates are categorized for domain controllers, servers, and workstations. These security templates have default settings designed by Microsoft. All of these templates are located in the C:\Windows\Security\Templates folder. The following is a partial list of the security templates that you will find in this folder:
Hisecdc.inf: This template is designed to increase the security and communications with domain controllers.
Hisecws.inf: This template is designed to increase security and communications for client computers and member servers.
Securedc.inf: This template is designed to increase the security and communications with domain controllers, but not to the level of the High Security DC security template.
Securews.inf: This template is designed to increase security and communications for client computers and member servers.
Setup security.inf: This template is designed to reapply the default security settings of a freshly installed computer. It can also be used to return a system that has been misconfigured to the default configuration.
Installing security templates simplifies network security for the administrator. You will have the opportunity to walk through the process of installing a security template in one of the end-of-chapter exercises.
Configuring Windows Server 2019 Properly
Many of the recommendations for Windows 10/11 apply equally to Windows Server 2019. This includes restricting access to the registry and using good password policies; however, there are some differences. The first is that when you first launch Windows Server 2019, you will see the Server Manager Dashboard, as shown in Figure 8-11.
)
FIGURE 8-11 Windows server 2019 – server manager dashboard
This dashboard is substantially similar in various versions of Windows Server, including Windows Server 2016. To manage the server you are on, simply select Local Server, as shown in Figure 8-12.
)
FIGURE 8-12 Windows server 2019 – manage local server
From this screen you can administer remote desktop/management settings as well as roles and features. There is even a best practices utility to determine if you are implementing best practices. Because servers typically have substantial amounts of data on them, security is even more important than for a workstation. There are several guides on the Internet for hardening Windows Server 2019. A few are listed here: